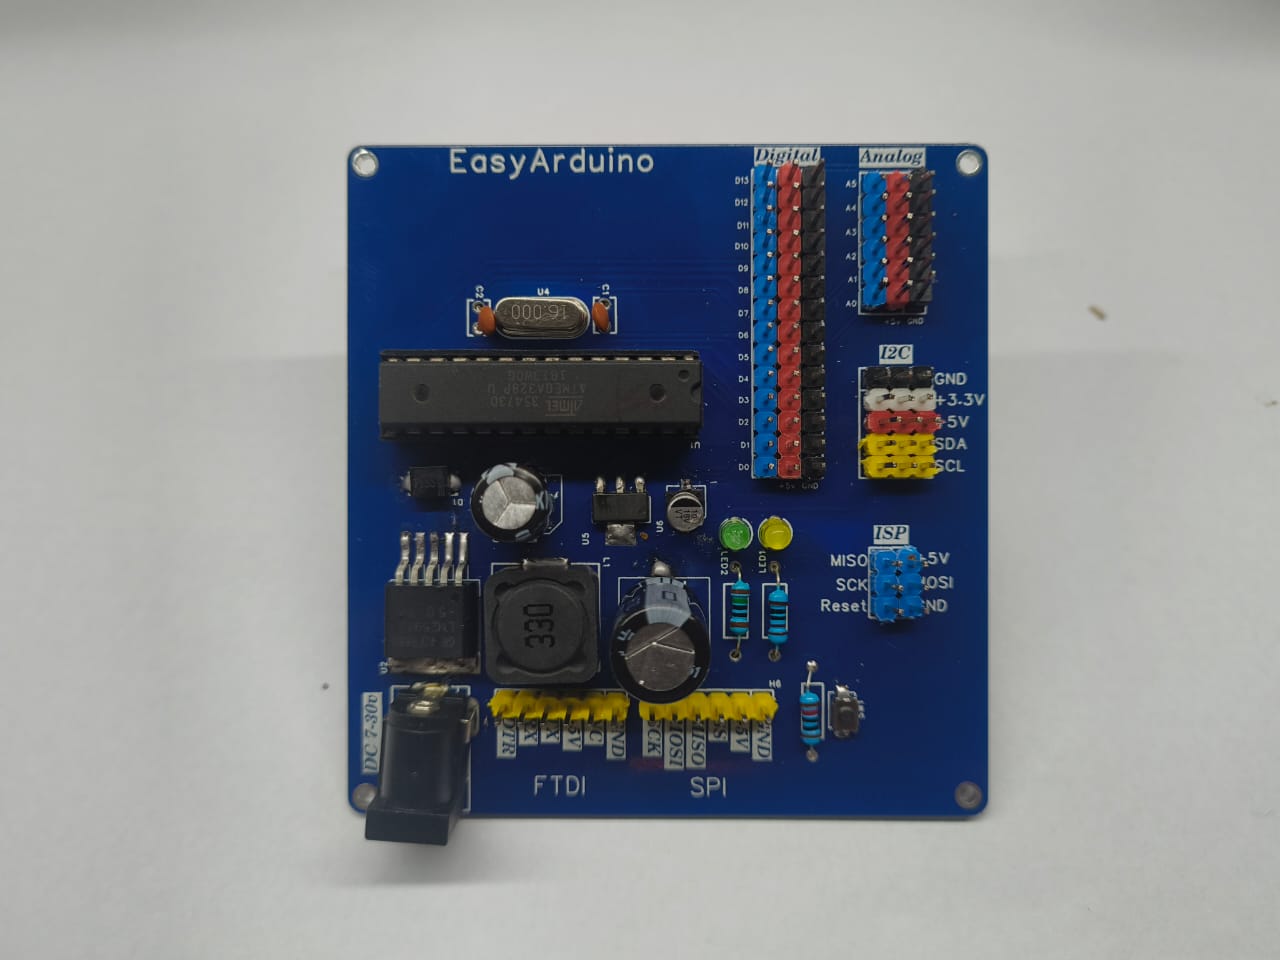
- ✅ ATmega328P-PU DIP – Arduino Uno compatible
- 🔌 FTDI 6-pin header for USB upload
- 🧠 ISP header for bootloader and SPI programming
- 📶 5x I²C headers with VCC, GND, SDA, SCL
- 🖲️ All digital (D2–D13) and analog (A0–A5) pins exposed with GND & 5V
- ⚡ Power input via DC jack (7–30V) and onboard voltage regulators:
- LM2985-5.0 → 5V
- AMS1117-3.3 → 3.3V for sensors/ESP
- 🧪 Test/learning-friendly layout with silkscreen labels
- 🔘 Onboard RESET button, Power LED, and D13 LED
DOWNLOAD ALL File And Project And Clone Repo
https://github.com/ElectroIoT/EasyArduino
- All 3-pin headers:
[GND | Dn | 5V] - PWM: D3, D5, D6, D9, D10, D11
- SPI: D10 (SS), D11 (MOSI), D12 (MISO), D13 (SCK)
- Also usable as digital (D14–D19)
GND | +3.3V | +5V | SDA | SCL
DTR | TX | RX | +5V | GND | NC
MISO | VCC
SCK  | MOSI
RST  | GND
- Connect an FTDI module to the 6-pin FTDI header
- In Arduino IDE:
- Select Board:
Arduino Uno - Choose correct COM port
- Upload your sketch!
- Select Board:
- Use DC Barrel Jack (7–30V)
- 5V & 3.3V rails automatically regulated onboard
Plug sensor into any I²C header and use code like:
#include <Wire.h>

void setup() {
  Wire.begin(); // I2C init
  Serial.begin(9600);
}

void loop() {
  Wire.beginTransmission(0x76); // Example address
  Wire.write(0xF4); // Example command
  Wire.endTransmission();
  delay(1000);
}
- Solder-it-yourself Arduino kit
- I²C sensor lab: OLED, BME280, RTC
- Learn SPI, I2C, UART, PWM
- Expand with ESP8266 via UART/I²C
- Website: https://electroiot.in
- Email: electroiot.in@gmail.com
- GitHub: github.com/ElectroIoT
- YouTube: @ElectroIoT-IN
MIT License – use it freely for education, learning, or hacking!
The ATmega328P-PU DIP compatibility is a great feature for beginners transitioning from other Arduino boards. I found some helpful supplementary information on while researching similar microcontroller projects.