
If you love gaming or working with Arduino projects, a PS2 Game Joystick Module (KY-023) is a must-have component. This analog joystick works just like the one in PlayStation controllers. It can be used to control robotic arms, drones, motorized systems, and even gaming applications.
In this tutorial, we will learn:
✅ How the PS2 joystick module works
✅ How to connect it with an Arduino Uno
✅ How to read joystick movement (X & Y axes) and button press
✅ How to display output in the Serial Monitor
What is a PS2 Game Joystick Module?
A PS2 Game Joystick Module is a simple 2-axis analog input device with a built-in push button.
🔹 X-Axis (VRX) – Left & right movement
🔹 Y-Axis (VRY) – Up & down movement
🔹 Button (SW) – Activated when the joystick is pressed down
It works like two potentiometers to detect movements, giving values between 0 and 1023.
Components Required 🛠
| Component | Quantity |
|---|---|
| Arduino Uno | 1 |
| PS2 Joystick Module | 1 |
| Jumper Wires | 5 |
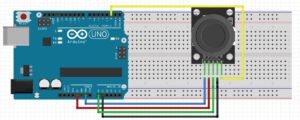
Wiring the PS2 Joystick with Arduino
Below is the wiring diagram for connecting the KY-023 joystick module to an Arduino Uno.
| Joystick Module Pin | Arduino Uno Pin |
|---|---|
| VRX (X-axis) | A0 |
| VRY (Y-axis) | A1 |
| SW (Button) | D2 |
| VCC | 5V |
| GND | GND |
Schematic Diagram
Here’s a schematic diagram to visually understand the connections:

Arduino Code for PS2 Joystick
Now, let’s write the Arduino code to read X and Y axis values and detect the button press.
Here Is My GitHub Link
All Code
https://github.com/ElectroIoT/37-in-1-Sensors-Kit-Code-And-Libraries
How It Works
1️⃣ Detecting X and Y Axis Movement
- The joystick works like two potentiometers, with values ranging from 0 to 1023.
- Centered Position: Around 512 (when the joystick is not moved).
- Left (X decreases), Right (X increases), Up (Y decreases), Down (Y increases).
2️⃣ Detecting Button Press
- The SW pin detects when the joystick is pressed down.
- LOW = Button Pressed
- HIGH = Button Not Pressed
Testing the Joystick Module 🎮
1️⃣ Connect the joystick module to the Arduino Uno as shown in the wiring diagram.
2️⃣ Upload the code to your Arduino using the Arduino IDE.
3️⃣ Open the Serial Monitor (9600 baud).
4️⃣ Move the joystick and observe how the X and Y values change.
5️⃣ Press the joystick button, and you should see “Pressed” in the Serial Monitor.
Applications of the PS2 Joystick Module
✅ Game Controllers – Build custom Arduino-based gamepads.
✅ Robotics & Drones – Control robotic arms, RC cars, and UAVs.
✅ Assistive Technology – Helps disabled individuals control devices easily.
✅ CNC & 3D Printers – Used for manual positioning and machine control.
✅ DIY Projects – Use it in home automation, motors, and interactive displays.
Conclusion
In this tutorial, we learned how to interface a PS2 Game Joystick Module with Arduino Uno. We covered:
✅ How the joystick works
✅ Circuit connections
✅ Arduino code to read movement & button press
✅ Testing & practical applications
Now, you can integrate this joystick into game controllers, robotic projects, and automation systems! 🚀
🔗 Connect with Me
🌐 Website
✉️ Email
📺 YouTube
🔬 Hackster.io
📖 Instructables
📢 Share this article if you found it useful! Happy coding! 🎮🚀