🚀 Introduction
Congratulations on setting up Solar Assistant on your Raspberry Pi! You’re now monitoring your solar system in real-time. But why stop there?
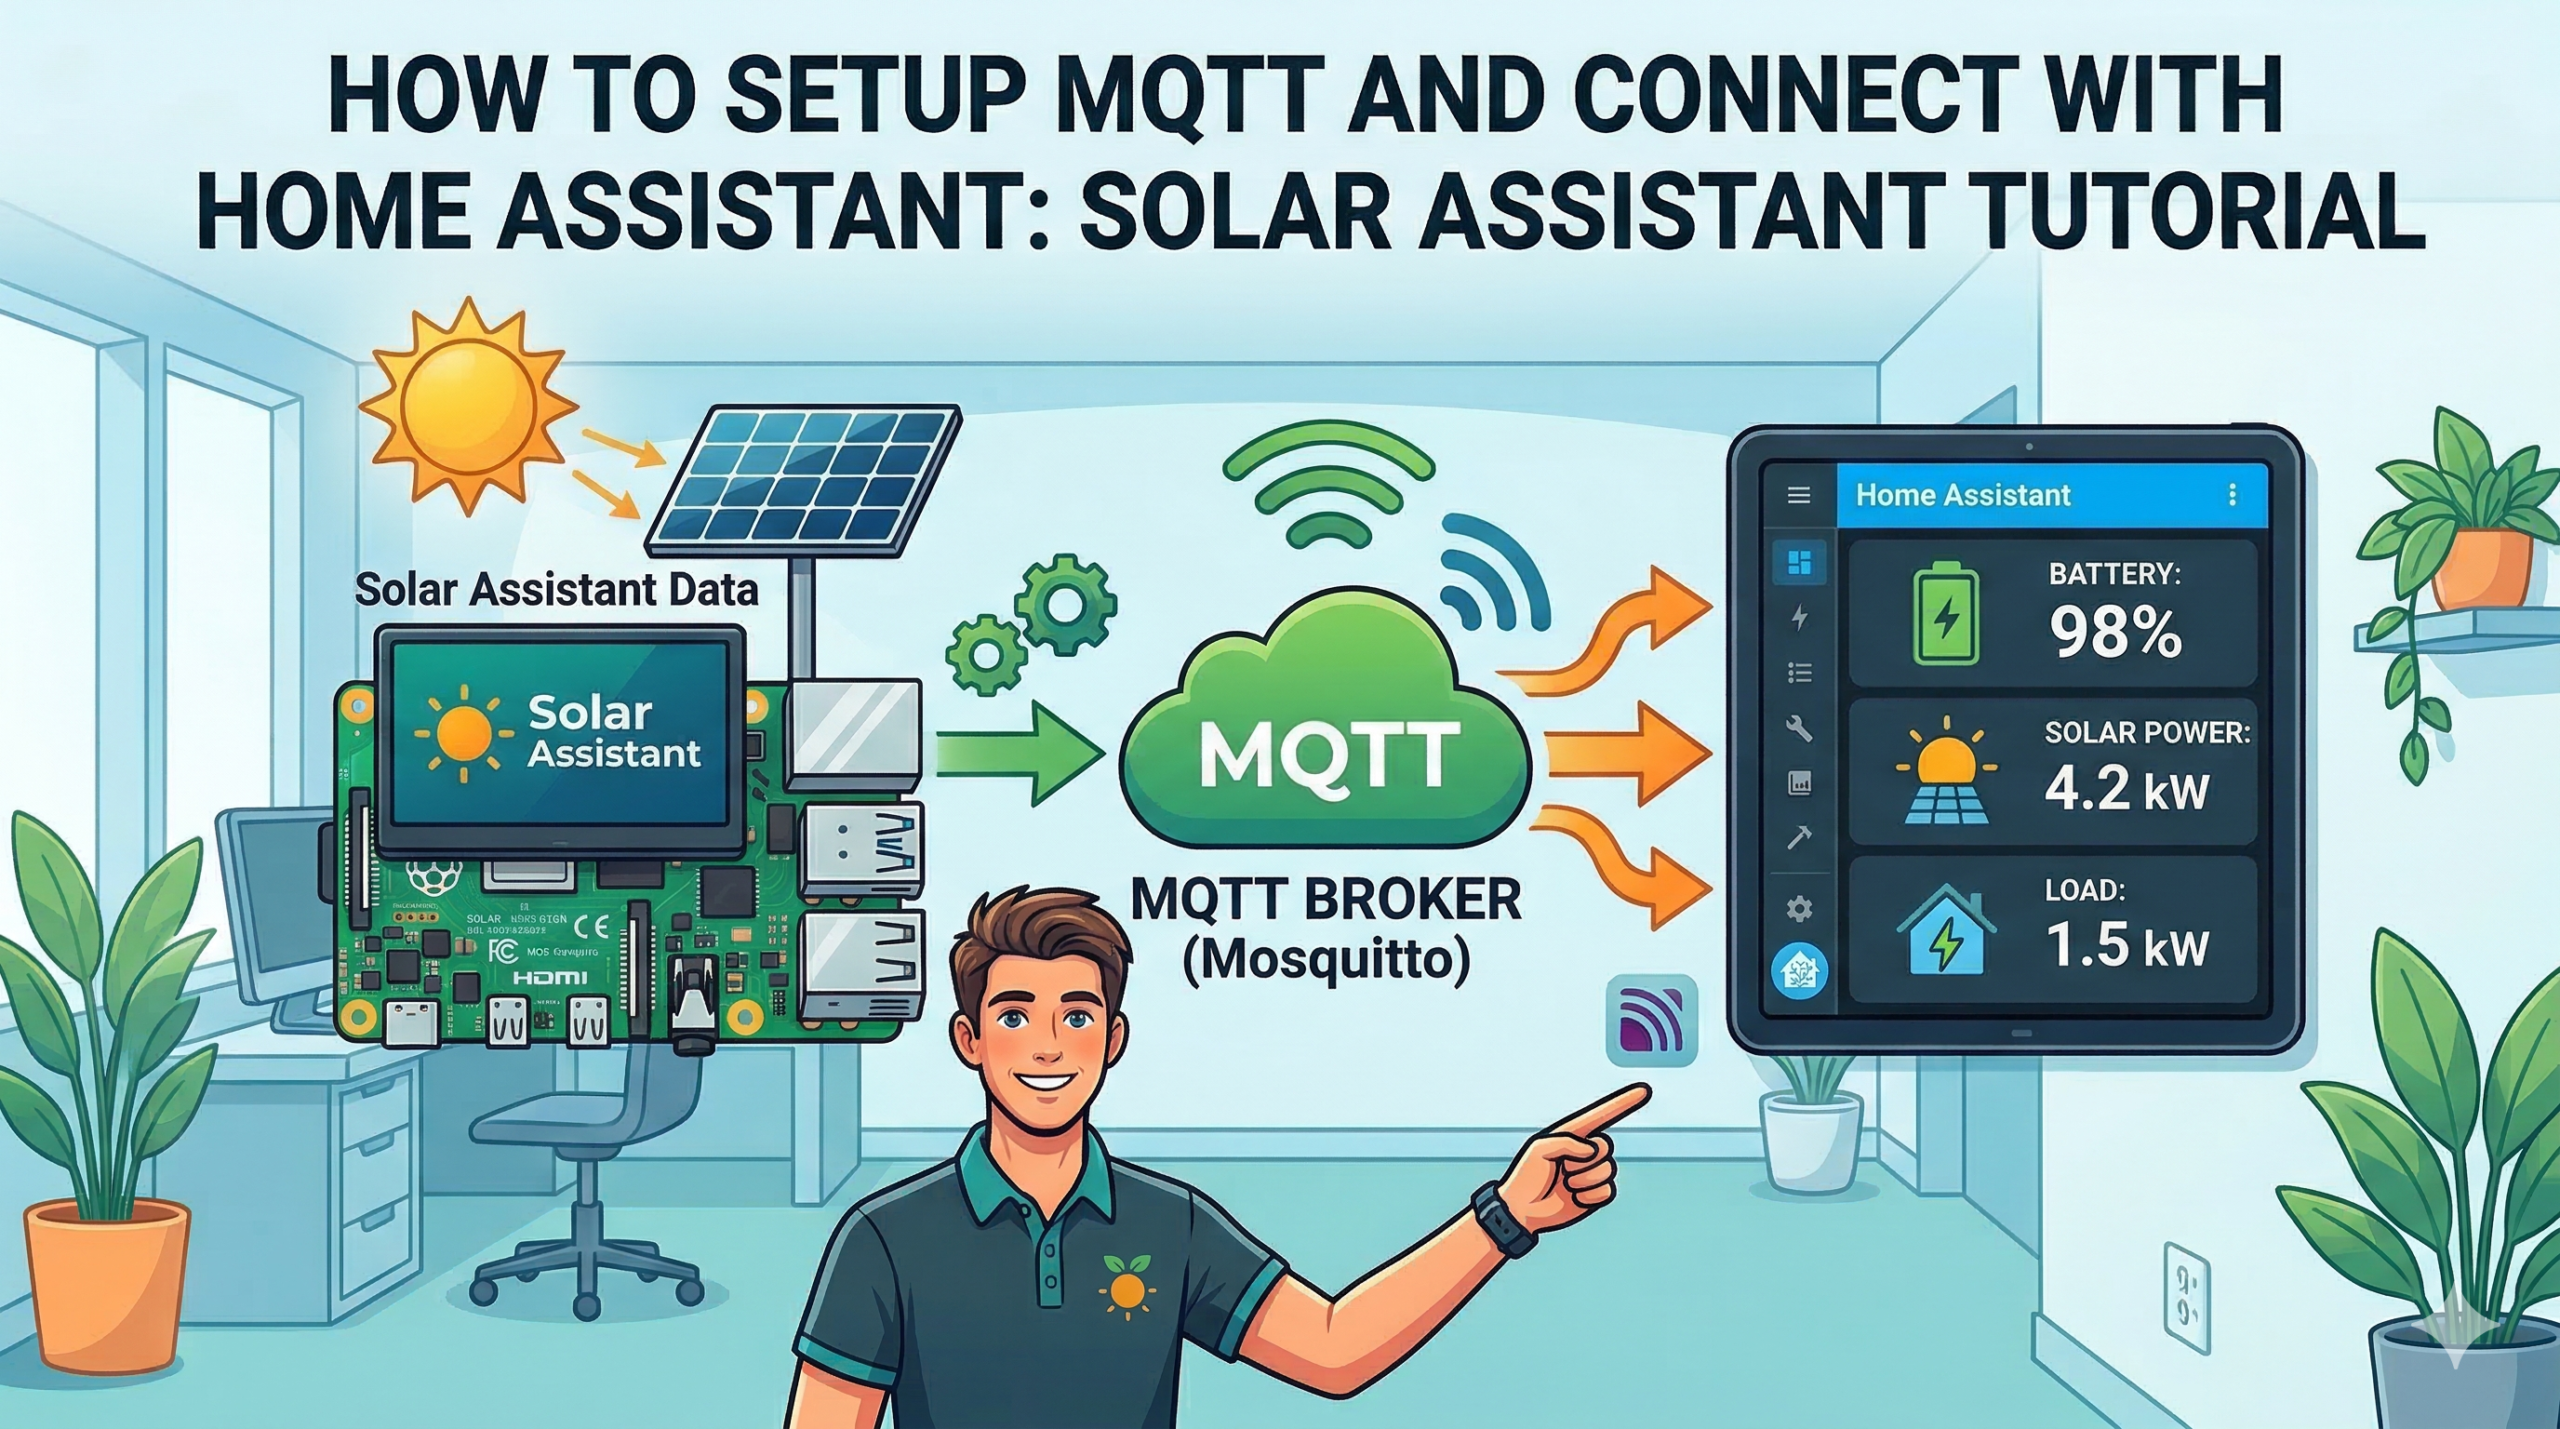
By connecting Solar Assistant to Home Assistant using MQTT, you unlock a whole new world of possibilities:
✅ View solar data directly on your Home Assistant dashboard
✅ Create powerful automations that save electricity bills
✅ Track long-term energy statistics
✅ Control inverter settings remotely
✅ Get alerts on your phone for critical events
In this comprehensive guide, I’ll show you step-by-step how to connect Solar Assistant to Home Assistant using MQTT. No prior experience required!
🎯 What You’ll Learn
-
What is MQTT and how it works (simple explanation)
-
How to enable MQTT in Solar Assistant
-
How to add MQTT integration in Home Assistant
-
How to verify data is flowing correctly
-
How to create a beautiful dashboard
-
How to build your first automation
-
Troubleshooting common issues
📋 Prerequisites
Before starting, make sure you have:
| Requirement | Status |
|---|---|
| ✅ Solar Assistant installed and running on Raspberry Pi | Need help? |
| ✅ Home Assistant installed (Raspberry Pi, VM, or any device) | Install Guide |
| ✅ Both devices on the same network | |
| ✅ Basic understanding of Home Assistant interface | |
✅ Your Solar Assistant IP address (e.g., 192.168.1.50) |
🤔 What is MQTT? (The Simple Explanation)
MQTT stands for Message Queuing Telemetry Transport. Sounds complicated? It’s actually simple!
Think of MQTT like a WhatsApp group:
-
Solar Assistant sends messages to the group (publishes data)
-
MQTT Broker (running on Solar Assistant) is the WhatsApp server that manages the group
-
Home Assistant reads messages from the group (subscribes to topics)
When Solar Assistant sends a message like “Battery is at 80%”, all devices listening (like Home Assistant) receive that information instantly.
The Magic: Auto Discovery ✨
Solar Assistant has a special feature called Auto Discovery. This means:
-
Solar Assistant automatically tells Home Assistant:
-
“Here are all my sensors”
-
“Here are their names and units”
-
“Here’s what data they provide”
-
-
Home Assistant automatically creates all the entities for you!
No manual configuration needed! This is what makes Solar Assistant so powerful.
⚙️ Step 1: Enable MQTT in Solar Assistant
Let’s start by configuring Solar Assistant to act as an MQTT broker.
1.1 Access Solar Assistant Web Interface
-
Open your web browser
-
Type your Solar Assistant IP address (e.g.,
http://192.168.1.50) -
You’ll see the Solar Assistant dashboard
1.2 Navigate to MQTT Settings
-
Click on Configuration tab (top menu)
-
Scroll down to the MQTT section
1.3 Configure MQTT Settings
Fill in these settings exactly as shown:
| Setting | Value | Description |
|---|---|---|
| Enable MQTT | ✅ CHECKED | This turns on MQTT |
| Topic Prefix | solar_assistant |
All topics will start with this |
| Auto Discovery | ✅ ENABLED | ⭐ CRITICAL: This must be enabled! |
| Username | mqttuser |
Choose any username |
| Password | mqttpassword |
Choose a strong password |
| Port | 1883 |
Default MQTT port |
| Allow writing from Home Assistant | ✅ Enable if you want control | Lets HA change inverter settings |
1.4 Save and Start
-
Click “Save” button
-
Then click “Start MQTT” button
-
Wait a few seconds for the service to start
✅ Verification: You should see a green “MQTT Running” status message.
🔌 Step 2: Add MQTT Integration in Home Assistant
Now let’s connect Home Assistant to Solar Assistant’s MQTT broker.
2.1 Open Home Assistant
-
Open your Home Assistant web interface
-
Log in if needed
2.2 Navigate to Integrations
-
Go to Settings (left sidebar)
-
Click on “Devices & Services”
-
You’ll see all your current integrations
2.3 Add MQTT Integration
-
Click the “Add Integration” button (bottom right corner)
-
In the search box, type “MQTT”
-
Click on “MQTT” from the search results
2.4 Configure MQTT Connection
A dialog box will appear. Enter these details:
| Field | Value | Notes |
|---|---|---|
| Broker | 192.168.1.50 |
Replace with YOUR Solar Assistant IP |
| Port | 1883 |
Default MQTT port |
| Username | mqttuser |
Same as Step 1 |
| Password | mqttpassword |
Same as Step 1 |
| Discovery | ✅ Keep enabled | This is important! |
2.5 Submit
-
Click “Submit”
-
Wait a few seconds for the connection to establish
🎉 Success! You should see a green success message: “Connected to MQTT broker”
✅ Step 3: Verify Data is Flowing
Now let’s confirm that Home Assistant is receiving data from Solar Assistant.
Method 1: Check MQTT Devices
-
Go to Settings → Devices & Services
-
Click on the MQTT integration
-
Go to the “Devices” tab
-
You should see your inverter listed (e.g., “FLIN Energy”, “Growatt”, “Luminous”)
-
Click on it – you’ll see 30-50 entities automatically discovered!
Method 2: Check via Developer Tools
-
Go to Developer Tools (left sidebar, under Settings)
-
Click on the “States” tab
-
In the search box, type “solar” or your inverter brand name
-
You should see all entities like:
sensor.solar_assistant_battery_state_of_charge
sensor.solar_assistant_pv_power
sensor.solar_assistant_load_power
sensor.solar_assistant_grid_power
sensor.solar_assistant_battery_voltage
sensor.solar_assistant_battery_current
... and many more!
What All These Entities Mean
| Entity | What It Shows |
|---|---|
battery_state_of_charge |
Battery percentage remaining |
pv_power |
Solar panels generation (Watts) |
load_power |
Home consumption (Watts) |
grid_power |
Grid import/export (Watts) |
battery_voltage |
Battery voltage |
battery_current |
Battery charging/discharging current |
pv_energy |
Total solar energy generated today |
grid_energy_in |
Grid import today |
grid_energy_out |
Grid export today |
🎯 Pro Tip: Negative values usually mean power flowing in the opposite direction. For example, negative grid power means you’re exporting to the grid!
📊 Step 4: Create a Beautiful Dashboard
Now for the fun part – displaying your solar data on a professional dashboard!
Option A: Simple Entities Card (Quick Start)
-
Go to Overview (left sidebar)
-
Click the three dots (top right corner) → “Edit Dashboard”
-
Click the “Add Card” button (bottom right)
-
Search for “Entities” and select it
-
Add these essential entities:
entities:
  - entity: sensor.solar_assistant_battery_state_of_charge
    name: Battery Level
  - entity: sensor.solar_assistant_pv_power
    name: Solar Generation
  - entity: sensor.solar_assistant_load_power
    name: Home Load
  - entity: sensor.solar_assistant_grid_power
    name: Grid Power
  - entity: sensor.solar_assistant_battery_voltage
    name: Battery Voltage
  - entity: sensor.solar_assistant_battery_current
    name: Battery Current
title: Solar Overview
type: entities
-
Click “Save”
Option B: Advanced Power Flow Card (Recommended)
For a professional, animated power flow diagram, install the Power Flow Card Plus:
Step 4.1: Install HACS (if not already installed)
-
Go to Settings → Add-ons
-
Click “Add-on Store” (bottom right)
-
Search for “HACS” and install it
-
Restart Home Assistant
Step 4.2: Install Power Flow Card Plus
-
Go to HACS (left sidebar)
-
Click on “Frontend”
-
Click “Explore & Download Repositories”
-
Search for “power-flow-card-plus”
-
Click “Download”
-
Refresh your browser
Step 4.3: Add Power Flow Card to Dashboard
-
Go to Overview → Edit Dashboard
-
Click “Add Card”
-
Search for “Power Flow Card Plus”
-
Paste this configuration:
type: custom:power-flow-card-plus
name: Solar Energy Flow
entities:
  entity: sensor.solar_assistant_battery_power
  solar:
    entity: sensor.solar_assistant_pv_power
  grid:
    entity: sensor.solar_assistant_grid_power
  load:
    entity: sensor.solar_assistant_load_power
  battery:
    entity: sensor.solar_assistant_battery_power
    state_of_charge: sensor.solar_assistant_battery_state_of_charge
invert_secondary: true
decimals: 1
watt_decimals: 1
color:
  mode: consistent
  battery:
    state_of_charge: true
  power_from_grid:
    state_of_charge: true
  solar:
    state_of_charge: true
    color_value: 80
-
Click “Save”
Result: A beautiful, animated diagram showing exactly how power flows between your solar panels, battery, home, and grid!
🤖 Step 5: Create Your First Automation
Now for the money-saving magic – automations!
Automation Idea: Turn On Geyser When Battery is Full
This automation turns on your geyser/water heater when:
-
Battery is above 90% (almost full)
-
Solar panels are generating significant power
-
It’s daytime (optional)
Step 5.1: Create New Automation
-
Go to Settings → Automations & Scenes
-
Click “Create Automation”
-
Click “Create New Automation”
Step 5.2: Set Trigger
trigger:
  - platform: numeric_state
    entity_id: sensor.solar_assistant_battery_state_of_charge
    above: 90
    below: 100
Step 5.3: Set Condition (Optional but Recommended)
condition:
  - condition: numeric_state
    entity_id: sensor.solar_assistant_pv_power
    above: 500  # Only if generating 500W+
Step 5.4: Set Action
action:
  - service: switch.turn_on
    target:
      entity_id: switch.geyser  # Replace with your geyser switch
Step 5.5: Save Automation
-
Give it a name: “Free Solar Geyser”
-
Click “Save”
Done! Now your geyser will automatically run on free solar power when the battery is full!
🔧 Advanced: Control Inverter Settings
If you enabled “Allow writing from Home Assistant” in Step 1, you can also control your inverter settings directly from Home Assistant!
Available Control Entities
| Entity | What It Controls |
|---|---|
select.solar_assistant_output_source_priority |
SBU, SUB, Utility first, etc. |
select.solar_assistant_max_charge_current |
Maximum charging current |
select.solar_assistant_battery_float_charge_voltage |
Float voltage setting |
select.solar_assistant_battery_absorption_charge_voltage |
Absorption voltage |
select.solar_assistant_shutdown_battery_voltage |
Low voltage cutoff |
Add Controls to Dashboard
-
Go to Overview → Edit Dashboard
-
Click “Add Card” → “Entities”
-
Add these select entities
-
They’ll appear as dropdown menus for easy control!
❗ Troubleshooting Common Issues
Issue 1: No Data Appearing in Home Assistant
Symptoms: MQTT integration shows “Connected” but no entities appear
Solutions:
✅ Check if Auto Discovery is ENABLED in Solar Assistant
✅ Verify username and password match exactly
✅ Try restarting both Solar Assistant and Home Assistant
✅ Check Solar Assistant logs for MQTT errors
Issue 2: Connection Refused
Symptoms: “Connection refused” error when adding MQTT integration
Solutions:
✅ Verify Solar Assistant IP address is correct
✅ Check if MQTT is started in Solar Assistant (not just enabled)
✅ Ensure port 1883 is not blocked by firewall
✅ Try pinging the Solar Assistant IP from your Home Assistant device
Issue 3: Some Entities Missing
Symptoms: Only some entities appear, others missing
Solutions:
✅ Some entities only appear when inverter is in specific modes
✅ Wait 2-3 minutes for auto discovery to complete
✅ Check if your inverter supports those specific data points
✅ Try restarting the MQTT service in Solar Assistant
Issue 4: Values Showing Wrong Units
Symptoms: Power showing in kW instead of W, etc.
Solutions:
✅ This is normal! Home Assistant automatically scales units
✅ You can adjust display settings in the card configuration
🎯 Next Steps: More Powerful Automations
Now that your solar data is in Home Assistant, here are some advanced automation ideas:
1. Grid Outage Alert
trigger:
  - platform: state
    entity_id: sensor.solar_assistant_grid_power
    to: "0"
action:
  - service: notify.mobile_app
    data:
      title: "⚠️ Grid Down"
      message: "Grid power failed. Running on battery!"
2. Battery Low Warning
trigger:
  - platform: numeric_state
    entity_id: sensor.solar_assistant_battery_state_of_charge
    below: 20
action:
  - service: notify.mobile_app
    data:
      title: "🔋 Battery Low"
      message: "Battery at {{ states('sensor.solar_assistant_battery_state_of_charge') }}%!"
3. Excess Solar Export Monitor
trigger:
  - platform: numeric_state
    entity_id: sensor.solar_assistant_grid_power
    below: -1000  # Exporting more than 1kW
action:
  - service: notify.mobile_app
    data:
      title: "💰 Exporting Power!"
      message: "Selling {{ states('sensor.solar_assistant_grid_power') }}W to grid"
4. Smart EV Charging
trigger:
  - platform: numeric_state
    entity_id: sensor.solar_assistant_battery_state_of_charge
    above: 95
condition:
  - condition: numeric_state
    entity_id: sensor.solar_assistant_pv_power
    above: 2000
action:
  - service: switch.turn_on
    target:
      entity_id: switch.ev_charger
📊 Energy Dashboard Integration
Home Assistant has a built-in Energy Dashboard that works perfectly with Solar Assistant!
Step 1: Configure Energy Dashboard
-
Go to Settings → Dashboards → Energy
-
Click “Add Grid Consumption” and select:
-
sensor.solar_assistant_grid_power(with negative values for export)
-
-
Click “Add Solar Production” and select:
-
sensor.solar_assistant_pv_power
-
-
Click “Add Battery System” and select:
-
sensor.solar_assistant_battery_power -
sensor.solar_assistant_battery_state_of_charge
-
Step 2: View Energy Dashboard
Now go to Overview → Energy to see:
-
📈 Beautiful graphs of your energy usage
-
🔋 Battery charge/discharge history
-
☀️ Solar production vs consumption
-
💰 Grid import/export costs
🔐 Security Considerations
When exposing MQTT or Home Assistant to the internet:
⚠️ NEVER expose port 1883 directly to the internet
⚠️ Use strong passwords (not mqttpassword!)
⚠️ Consider using VPN (Tailscale/WireGuard) for remote access
⚠️ Enable Home Assistant’s built-in 2FA
⚠️ Regularly update both Solar Assistant and Home Assistant
🎉 Conclusion
Congratulations! You’ve successfully connected Solar Assistant to Home Assistant using MQTT. Now you have:
✅ Live solar data in your Home Assistant dashboard
✅ Beautiful power flow visualization
✅ Automated control of appliances based on solar availability
✅ Energy tracking and statistics
✅ Foundation for unlimited automations
Your solar system is now truly smart! 🚀