
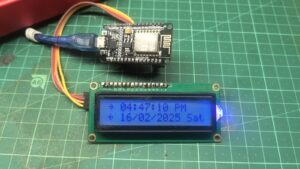
This project uses an ESP8266 NodeMCU to create a 12-hour format NTP clock with AM/PM, date, and day of the week, displayed on a 16×2 I2C LCD. The clock synchronizes time via the NTP (Network Time Protocol) to ensure accuracy.
Features
- Displays real-time clock (12-hour format) with AM/PM indicator.
- Shows current date and weekday.
- Synchronizes time via NTP server.
- Uses I2C 16×2 LCD for display.
- Auto-updates time based on Indian Standard Time (IST, UTC+5:30).
Components Required
| Component | Quantity |
|---|---|
| ESP8266 NodeMCU | 1 |
| 16×2 I2C LCD | 1 |
| Jumper Wires | As needed |
Circuit Diagram
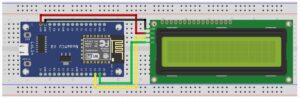
Connections
| ESP8266 Pin | LCD Pin |
|---|---|
| 3.3V | VCC |
| GND | GND |
| D2 (GPIO4) | SDA |
| D1 (GPIO5) | SCL |
Installation & Setup
1. Install Required Libraries
Make sure you have the following libraries installed in Arduino IDE:
- LiquidCrystal_I2C (Download)
- NTPClient (Download)
- ESP8266WiFi (Comes with ESP8266 board package)
2. Upload the Code
CODE Download Link
https://github.com/ElectroIoT/ESP8266-NTC-Indian-Time-clock-Using-16×2-LCD
- Open the provided code in Arduino IDE.
- Replace
your_SSIDandyour_PASSWORDwith your WiFi credentials. - Select ESP8266 NodeMCU as the board.
- Upload the code and open the Serial Monitor (115200 baud rate).
How the Code Works
- WiFi Connection: Connects ESP8266 to a WiFi network.
- NTP Synchronization: Fetches time from an NTP server (pool.ntp.org).
- Time Conversion: Converts 24-hour format to 12-hour format with AM/PM.
- Display Update: Updates the LCD every second with time, date, and weekday.
Clock Demo
License
This project is open-source and free to use.
Contributions
Feel free to fork this project and contribute!
Troubleshooting
LCD not displaying anything?
- Run the I2C Scanner to find the correct I2C address and update it in the code.
- Ensure SDA and SCL pins are connected properly.
WiFi not connecting?
- Double-check your WiFi SSID and Password in the code.
- Make sure your router is working correctly.
For further assistance, feel free to ask! 🚀
🔗 Connect with Me